
这个分支版本增加了很多功能:在线设备数量限制,支持vless的reality/h2等。
项目地址:https://Github.com/wyx2685/v2board
配套后端:https://Github.com/wyx2685/XrayR
安装v2board
以下安装步骤基于debian12,安装nginx/mariadb/redis/certbot:
apt -y install nginx python3-certbot-nginx mariadb-server redis-server
安装php7.4:
apt -y install curl apt-transport-https ca-certificates lsb-release curl -sSLo /usr/share/keyrings/deb.sury.org-php.gpg https://packages.sury.org/php/apt.gpg echo "deb [signed-by=/usr/share/keyrings/deb.sury.org-php.gpg] https://packages.sury.org/php/ $(lsb_release -sc) main" > /etc/apt/sources.list.d/php.list apt -y install php7.4-common php7.4-cli php7.4-fpm php7.4-gd php7.4-mysql php7.4-mbstring php7.4-curl php7.4-xml php7.4-xmlrpc php7.4-zip php7.4-intl php7.4-bz2 php7.4-bcmath php7.4-redis
如果你的系统之前安装过别的php版本,可以使用下面的命令切换到7.4:
update-alternatives --config php
安装composer:
curl -sS https://getcomposer.org/installer | php -- --install-dir=/usr/local/bin --filename=composer
配置mariadb数据库:
mysql_secure_installation
登录mariadb数据库:
mysql -u root -p
创建数据库和用户:
CREATE DATABASE v2board CHARACTER SET utf8mb4 COLLATE utf8mb4_unicode_ci; GRANT ALL PRIVILEGES ON v2board.* TO v2board@localhost IDENTIFIED BY 'password'; FLUSH PRIVILEGES; quit
获取v2board修改版的源码:
cd /var/www git clone https://github.com/wyx2685/v2board.git cd v2board/
安装依赖:
composer install
安装v2board:
php artisan v2board:install
修改权限和所有者:
chmod -R 755 v2board/ chown -R www-data:www-data v2board/
添加计划任务:
crontab -u www-data -e
写入如下配置:
* * * * * php /var/www/v2board/artisan schedule:run >> /dev/null 2>&1
新建队列服务:
nano /etc/systemd/system/horizon.service
写入如下配置:
[Unit] Description=Laravel Horizon Queue Manager After=network.target [Service] user=www-data ExecStart=/usr/bin/php /var/www/v2board/artisan horizon Restart=always [Install] WantedBy=multi-user.target
启动并设置开机自启:
systemctl enable --now horizon.service
新建nginx站点配置文件:
nano /etc/nginx/sites-available/v2board
写入如下配置:
server { listen 80; server_name v2board.example.com; root /var/www/v2board/public; index index.php; client_max_body_size 0; location /downloads { } location / { try_files $uri $uri/ /index.php$is_args$query_string; } location ~ .php$ { include snippets/fastcgi-php.conf; fastcgi_pass unix:/var/run/php/php7.4-fpm.sock; } }
启用站点:
ln -s /etc/nginx/sites-available/v2board /etc/nginx/sites-enabled/v2board
签发SSL证书:
certbot --nginx
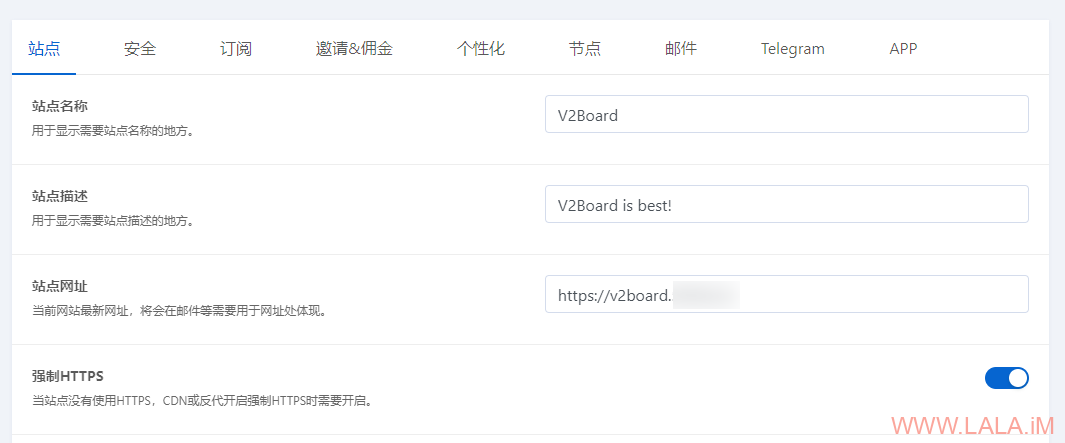
登录管理后台,配置站点域名:
配置通讯密钥(apikey)

安装后端
apt -y update apt -y install unzip mkdir -p /opt/xrayr-mod && cd /opt/xrayr-mod curl -Lo XrayR-linux-arm64-v8a.zip https://github.com/wyx2685/XrayR/releases/download/v0.9.2-20231027/XrayR-linux-arm64-v8a.zip unzip XrayR-linux-arm64-v8a.zip
新建systemd服务:
nano /etc/systemd/system/xrayr.service
写入如下配置:
[Unit] Description=XrayR Backend Server After=network.target [Service] AmbientCapabilities=CAP_NET_BIND_SERVICE WorkingDirectory=/opt/xrayr-mod ExecStart=/opt/xrayr-mod/XrayR -c config.yml Restart=always [Install] WantedBy=multi-user.target
对接Reality节点
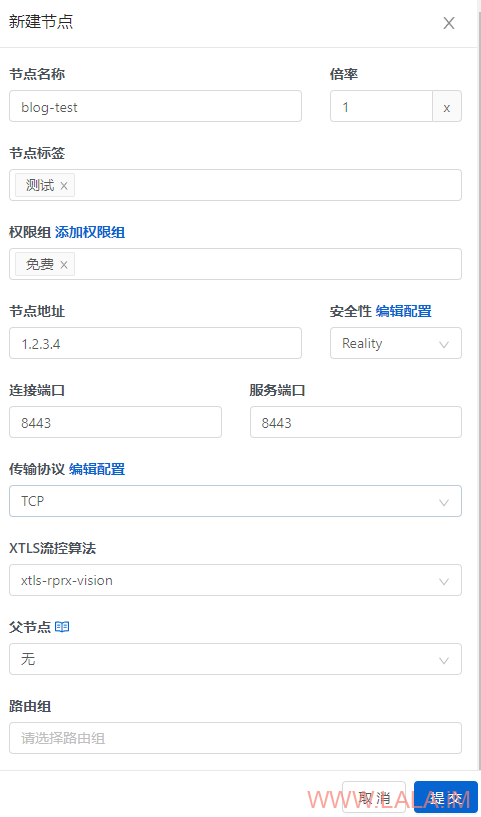
在面板新建vless节点,按下图配置:
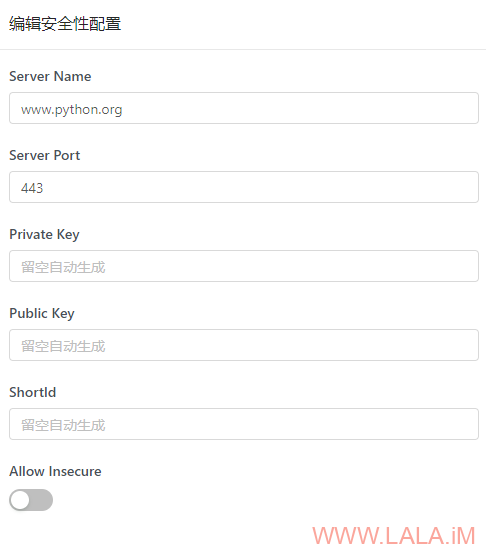
编辑安全性设置,按下图配置:
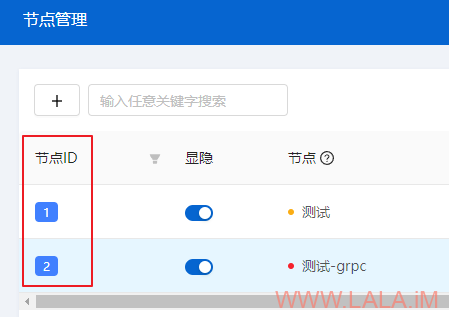
记住节点ID:
编辑后端配置文件:
nano /opt/xrayr-mod/config.yml
一个示例配置(…表示省略掉的配置,保持config.yml文件内默认的配置即可,不需要做修改)
... Nodes: - PanelType: "NewV2board" # Panel type: SSpanel, NewV2board, PMpanel, Proxypanel, V2RaySocks, GoV2Panel ApiConfig: ApiHost: "https://v2board.example.com" # v2board面板域名 ApiKey: "imlala" # 在v2board面板设置的apikey NodeID: 1 # v2board节点id NodeType: V2ray # Node type: V2ray, Shadowsocks, Trojan, Shadowsocks-Plugin Timeout: 30 # Timeout for the api request EnableVless: true # Enable Vless for V2ray Type VlessFlow: "xtls-rprx-vision" # Only support vless SpeedLimit: 0 # Mbps, Local settings will replace remote settings, 0 means disable DeviceLimit: 0 # Local settings will replace remote settings, 0 means disable RuleListPath: # /etc/XrayR/rulelist Path to local rulelist file ControllerConfig: ... AutoSpeedLimitConfig: ... GlobalDeviceLimitConfig: ... EnableFallback: false # Only support for Trojan and Vless FallBackConfigs: # Support multiple fallbacks ... DisableLocalREALITYConfig: true # 直接从面板下发reality节点配置,启用了这个就可以忽略掉EnableREALITY、REALITYConfigs。 EnableREALITY: false # Enable REALITY REALITYConfigs: ... CertConfig: CertMode: none # Option about how to get certificate: none, file, http, tls, dns. Choose "none" will forcedly disable the tls config. ... ...
说明:DisableLocalREALITYConfig使用这个选项后,直接从面板下发reality节点配置信息,所以配置文件里面就不需要配置reality相关的东西了。
启动后端并设置开机自启:
systemctl enable --now xrayr.service
对接VLESS+gRPC+CDN节点
在面板新建vless节点,按下图配置:
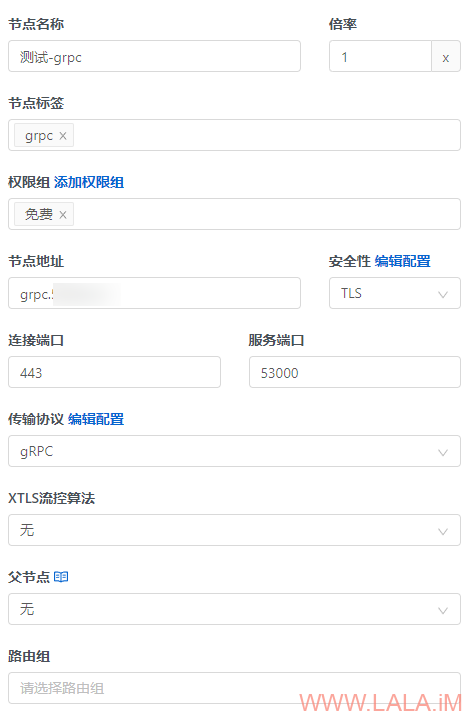
编辑安全性设置,按下图配置,注意这里只需要配置一个SNI即可,其他的都留空:

编辑协议配置:
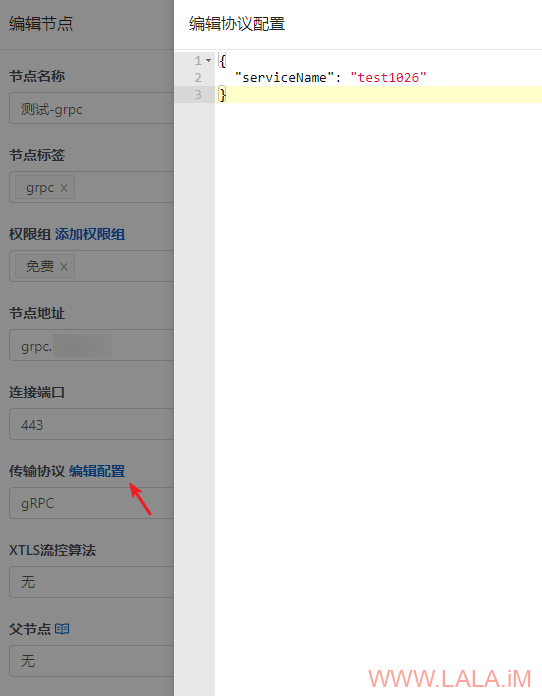
写入如下配置:
{ "serviceName": "test1026" }
记住节点ID:

编辑后端配置文件:
nano /opt/xrayr-mod/config.yml
一个示例配置(…表示省略掉的配置,保持config.yml文件内默认的配置即可,不需要做修改)
... Nodes: - PanelType: "NewV2board" # Panel type: SSpanel, NewV2board, PMpanel, Proxypanel, V2RaySocks, GoV2Panel ApiConfig: ApiHost: "https://v2board.example.com" ApiKey: "imlala" NodeID: 2 NodeType: V2ray # Node type: V2ray, Shadowsocks, Trojan, Shadowsocks-Plugin Timeout: 30 # Timeout for the api request EnableVless: true # Enable Vless for V2ray Type VlessFlow: "xtls-rprx-vision" # Only support vless SpeedLimit: 0 # Mbps, Local settings will replace remote settings, 0 means disable DeviceLimit: 0 # Local settings will replace remote settings, 0 means disable RuleListPath: # /etc/XrayR/rulelist Path to local rulelist file ControllerConfig: ListenIP: 127.0.0.1 # IP address you want to listen ... AutoSpeedLimitConfig: ... GlobalDeviceLimitConfig: ... EnableFallback: false # Only support for Trojan and Vless FallBackConfigs: # Support multiple fallbacks ... DisableLocalREALITYConfig: false # disable local reality config EnableREALITY: false # Enable REALITY REALITYConfigs: ... CertConfig: CertMode: none # Option about how to get certificate: none, file, http, tls, dns. Choose "none" will forcedly disable the tls config. ... ...
安装nginx:
apt -y install nginx
新建nginx配置文件:
nano /etc/nginx/sites-available/grpc
写入如下配置:
server { listen 80; server_name grpc.example.com; if ($host = grpc.example.com) { return 301 https://$host$request_uri; } return 404; } server { listen 443 ssl http2 so_keepalive=on; server_name grpc.example.com; index index.nginx-debian.html; root /var/www/html; ssl_certificate /etc/nginx/cert/grpc.example.com.pem; ssl_certificate_key /etc/nginx/cert/grpc.example.com.key; ssl_protocols TLSv1.2 TLSv1.3; ssl_ciphers ECDHE-ECDSA-AES128-GCM-SHA256:ECDHE-RSA-AES128-GCM-SHA256:ECDHE-ECDSA-AES256-GCM-SHA384:ECDHE-RSA-AES256-GCM-SHA384:ECDHE-ECDSA-CHACHA20-POLY1305:ECDHE-RSA-CHACHA20-POLY1305:DHE-RSA-AES128-GCM-SHA256:DHE-RSA-AES256-GCM-SHA384; location /test1026 { if ($content_type !~ "application/grpc") { return 404; } client_max_body_size 0; client_body_buffer_size 1m; client_body_timeout 1h; grpc_pass grpc://127.0.0.1:53000; grpc_set_header X-Real-IP $remote_addr; } }
启用站点:
ln -s /etc/nginx/sites-available/grpc /etc/nginx/sites-enabled/grpc
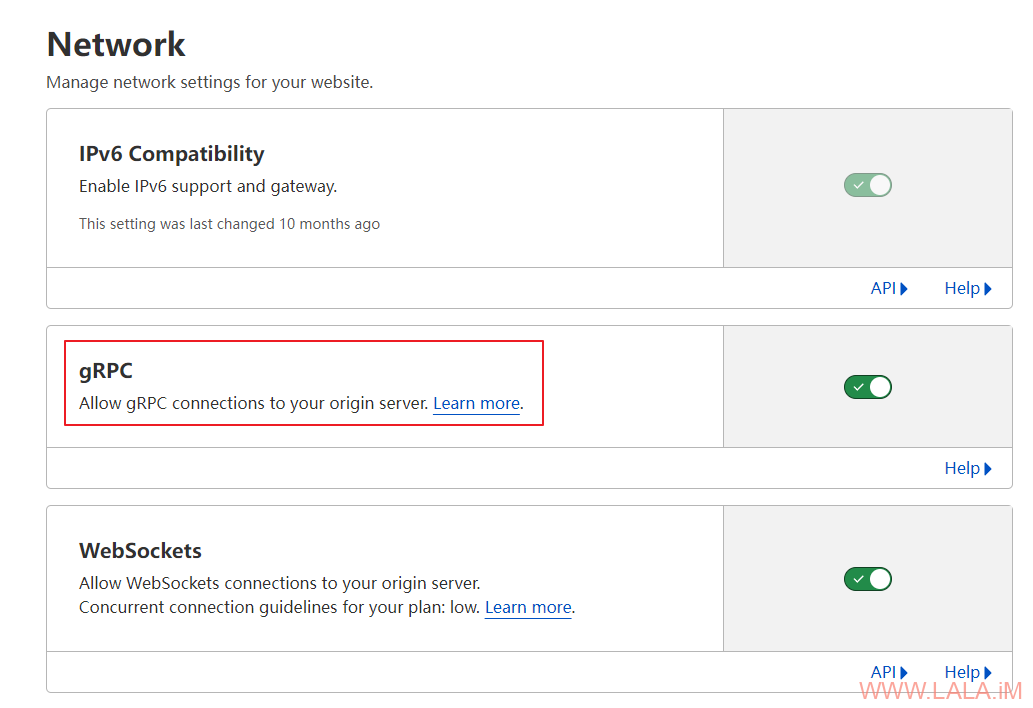
转到cloudflare,添加域名a记录并启用CDN:
![]()
转到Network,启用gRPC回源:
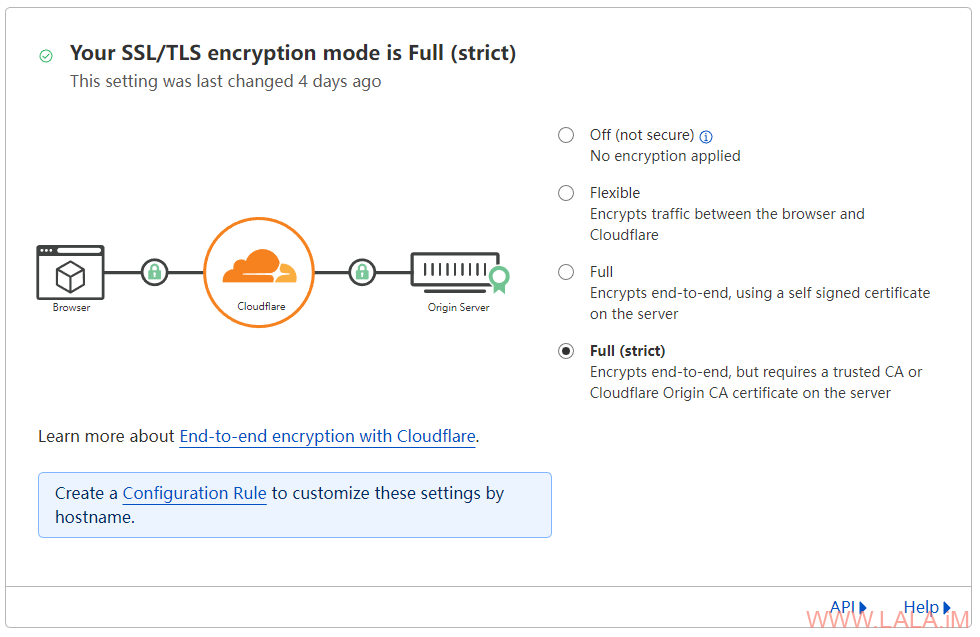
转到SSL/TLS-Overview,将encryption mode改为Full (strict):
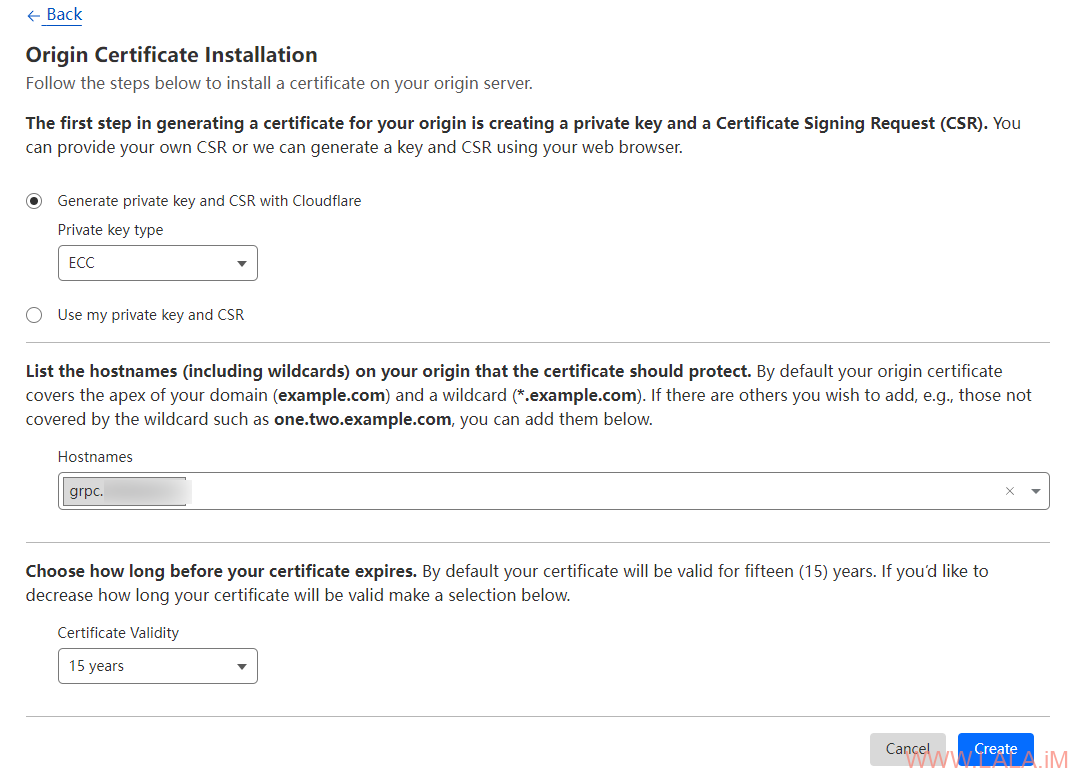
转到SS/TLS-Origin Server,申请一个免费15年的证书:
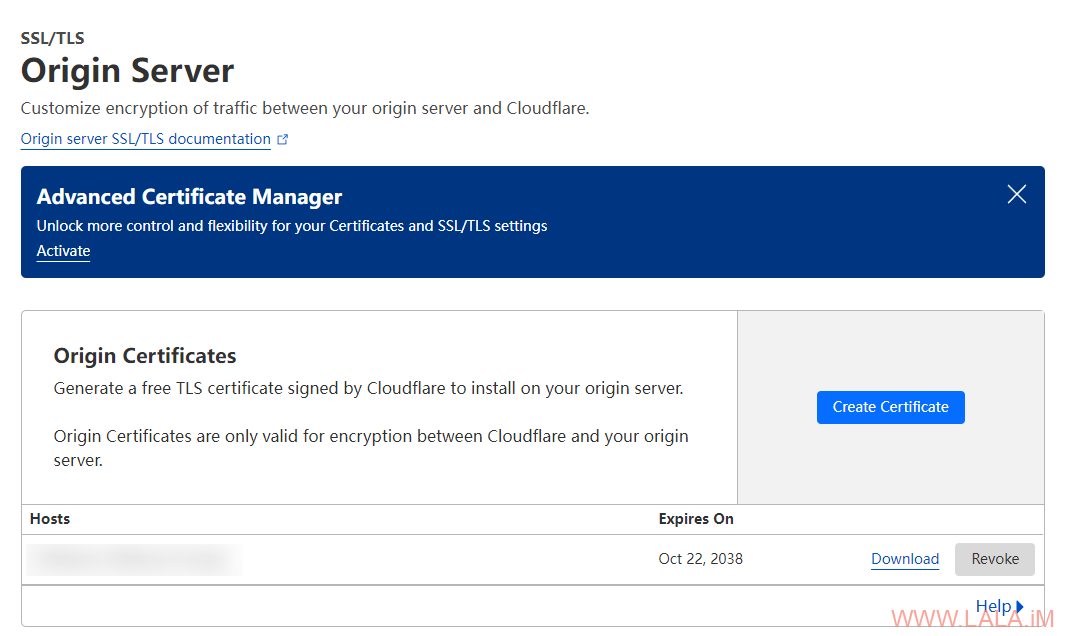
类型选ECC,hostnames填你的域名或者直接通配符也行:
将证书(PEM)和密钥(KEY)分别复制保存到如下文件:
mkdir -p /etc/nginx/cert nano /etc/nginx/cert/grpc.example.com.pem nano /etc/nginx/cert/grpc.example.com.key
重载nginx使其生效:
systemctl reload nginx